Audio Calls
Audio Calls
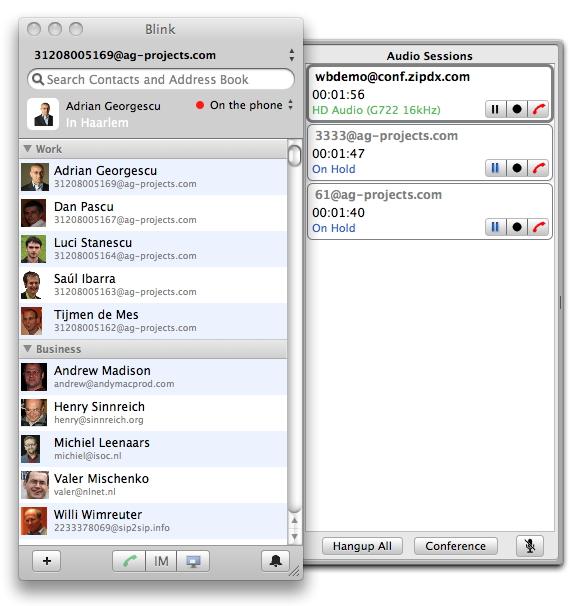
Audio Calls are displayed in the lateral drawer attached to the main interface.
To start an Audio Call, select an existing contact or enter a SIP address or telephone number in the search bar. Once text is entered in the search bar just press Enter to start an audio call to that address. Alternatively, you can turn on the dialpad in the Contacts menu and press its keys.
When a Contact is selected, you may click on the located at the bottom of the main interface or right click on thr Contact and select Start Audio Session from the contextual menu. For each new call an entry is added to the Audio Calls drawer.
To switch between multiple calls just click on another call in the audio sessions drawer. When switching to a particular session, the audio stream is connected to the input and output device and all other Audio Calls are put on hold.
To add Chat to an existing Audio Call, right click on the session displayed in the Audio Drawer and select an Add Chat
To mute your microphone click on the bottom right microphone icon. To un-mute click it again.
Audio Codecs
Audio codecs can be set in Preferences->Advanced->RTP Media section and can be overwritten per account in Advanced->RTP Media section. By default, the audio codecs are prioritized to allow for highest quality and second, compatibility with SIP services.
If you have changed the defaults or want to set the codecs manually,
for high quality conversations it is recommended to use OPUS, Speex, G.722 codec order and leave PCMA and PCMU enabled for compatibility reasons.
Some details about the codecs used by Blink:
OPUSis the best codec choice covering full human audible spectrum and requires between 20 and 60kbit/s network bandwidth. This codec is available in Blink Pro 3.0.Speexis a high quality codec that is often built in softphones covering up to 16kHz audio spectrum and requires about 50kbit/s network bandwidthG.722is the most compatible wideband codec supported by both software and hardware phones covering 11kHz audio spectrum and requires about 100kbit/s network bandwidthPCMA(G711A) andPCMU(G711U) are the most interoperable codecs narrowband that work with any device covering up to 4kHz audio spectrum (telephone quality) and requires about 100kbit/s network bandwidthGSMandiLBCuse less bandwidth than the other codecs but they have less support in other devices and cover up to 4kHz audio spectrum and requires up to 40kbit/s network bandwidth
Best Speech Quality
To obtain best audio quality for speech you must:
Use a wideband codec like
Speex,G.722orOPUSHave Acoustic Echo Cancellation enabled in Blink Audio Preferences, this will set the internal sampling rate to 32kHz covering up to 16kHz audio spectrum
Enable Ambient Noise Reduction in System Sound Preferences, this will remove the fan and other low frequency noises
If available bandwidth is an issue, use
OPUS,Speex,G.722codecs order in Advanced RTP media preferences
You may use any headset or no headset (speakerphone mode).
Best Studio Quality
To obtain best possible audio quality and remove all delays and distortions of the original signals introduced by the computer software and hardware you must do the following:
Use a high quality headsets and microphones (low delay at least
41000 Hzsample rate)Disable Acoustic Echo Cancellation (AEC) in Blink Audio Preferences. This will disable the built-in noise reduction and echo cancellation algorithms as well as increasing the internal sampling rate to
48kHzDisable Ambient Noise Reduction in System Sound Preferences
Use
OPUScodec, with the AEC disabled, it will cover up to20kHzaudio spectrum
DTMF
Dial tones are used to interact with PBX and IVR systems or legacy PSTN gateways. To send DTMF tones, focus the Audio Call by clicking on it. The current call is already focused if you just started it. What you then type on the keyboard is automatically translated into DTMF tones. Alpha-numeric keys are translated into numeric DTMF keys as they are on a numeric telephone keypad. Also you may use the dialpad for this purpose.
If a telephone number with a # sign is dialed, what comes after the # sign
will be automatically entered as DTMF codes once the call is connected.
Supported DTMF codes are 0-9*#. You can use the comma sign , to
insert a one second pause (version >=1.5.1). You can use other delimiter by
setting it in Phone Numbers advanced section of the SIP Account.
You can paste a string containing 0 to 9 digits, # and * from the
Clipboard in the active audio call. These are then sent out as DTMF codes.
Hangup
To hangup click on the displayed for each Audio Session in the right hand side of the drawer or press the Escape.
Hold/Unhold
The shortcut key for hold and unhold of the selected session is Space.
Record
To record click on the . While recording, the circle will toggle between red and black. Recorded sessions can be found in menu History->Audio Recordings.
Transfer
To blindly transfer a call, just drag it to a contact in the Contacts list. You can also enter a number or address in the search bar, to transfer a call to an arbitrary address.
To perform an assisted call transfer, first establish a call to each party. Then, click on the T button for completing the transfer, a contextual menu is presented.
Call History
History of previous sessions is available in the History menu. If you have registered a SIP Account with Blink, you can review the missed calls while Blink was off-line in Account->Settings on SIP Server->History menu.
Redial
To redial the last session type Command + R, to redial a previous session select it in the History menu.
iTunes Integration
iTunes automatically pauses playing before any Audio Call pauses and resumes playing after all Audio Calls have finished. This functionality does not work when Blink runs in Sandbox mode (starting with Pro version 1.9.0 and Lite version 1.7.0) due to Apple imposed restrictions.
Audio Information

Audio Calls have status indication about the progress of establishment of the RTP stream and ICE negotiation, the negotiated codec and the presence of encryption for signaling and media.
The RTP end-points and negotiated ICE candidates (when ICE negotiation succeeded) are displayed when hovering the mouse over the Audio codec information area.
Phone Numbers
To dial a phone number, just enter the number in the Search Box followed by Enter or Return.
When dialing numbers by selecting entries from the Address Book it is
recommended that you store your numbers in international E.164 format (that is + sign followed by the country code then the subscriber number).
You can set in the account Advanced->Phone Numbers preferences section how to
replace the + sign with another prefix recognized by your SIP service provider
or PBX. For example if you set Replace Starting + with 001, when you dial
+44XXX the number will be dialed as 00144XXX.
Optionally, phone numbers can be also prefixed before dialing out, for example
if a 9 is required by your PBX by setting the External Line Prefix option.
If you have created a SIP Account with Blink, you can call to PSTN numbers if
you must have a positive credit. You can use a Credit Card to add Credit to
your SIP Account in menu Tools->Call To Phone Numbers.... You may request the
assignment of a PSTN Caller Id by opeing a ticket in the server support
interface. Recognized number formats are + or 00 followed by the
Country Code and then Subscriber Number.
If you use another SIP Account than the one provided by Blink, access to the PSTN is subject to the support provided by your SIP service provider. The number format depends as well on the conventions imposed by the SIP service provider in question.
Voicemail
Voicemail is a feature provided for SIP accounts created by Blink. It is
provided by the network while Blink is offline, when the call forwarding to
Voicemail is activated. To change the settings of your SIP2SIP voicemail box
dial 1233. You can record your unavailable message and listen to your messages
stored on the server. The voicemail delivered method (by email attachement or by
dialing into the server) is set in menu Tools->Settings on SIP server in the
Voicemail section.
Answering Machine
When the Answering Machine is enabled, Audio Call requests will be automatically answered with either the standard or the custom recorded message after the delay configured set in Preferences->Answering Machine settings.
You can enable the Answering Machine using the menu item Tools->Enable Answering Machine. The incoming Audio Calls are then recorded and can be listened to later in Tools->Recordings menu.
While the Answering Machine is handling an Audio Call, you can hear what the remote party is speaking while your microphone is muted. If you wish you can take over by clicking on the in the Audio drawer. The recording stops and the session is connected to the microphone.
Audio Conference
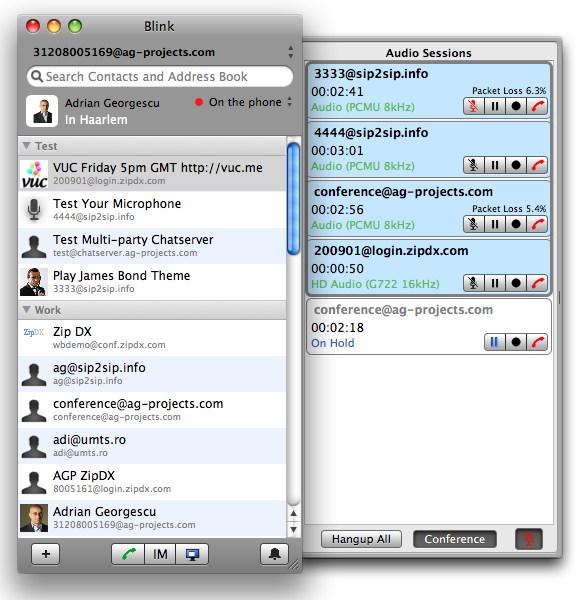
Drag and drop Audio Calls on top of each other to create a "Conference" or use the button presented at the botton at the Audio Drawer to start a Conference with all active Audio Calls.
Add new participants to a Conference by dragging Contacts from the Contacts List onto an Audio Call.
Each participant can be muted individually by pressing on the microphone symbol that appears on each conferenced session.
To end an Audio Conference drag the session out of the conference area or press the Conference button again.
There can be only one active Audio Conference at any given time.