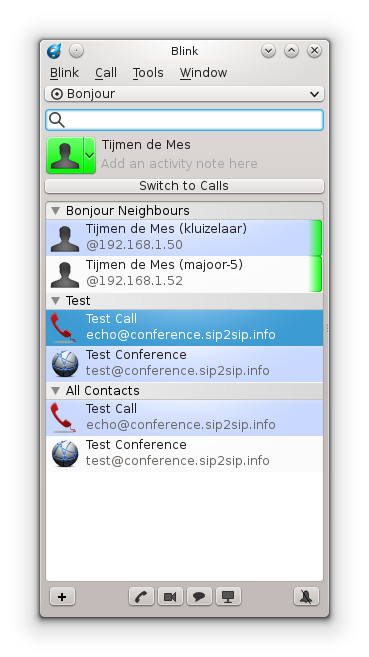
Main Interface
Blink presents a Contacts driven interface as the main window. The design allows to locate a Contact then to start an action for it, for example to start an audio call.
Hover the mouse over the GUI elements to see a short description of their function.
SIP Account
You can select the SIP Account used as identity for outbound sessions in the Accounts drop down box presented on the top of the main interface.
The free account option uses SIP2SIP.info service to create a SIP account that supports all advanced Blink features (chat, presence, contacts synchronization, file transfers and screen sharing).
Bonjour Account
Bonjour Account is a special type of account that is designed to announce itself and discover other neighbours on the local area network. This account does not require a server or SIP service in order to operate.
Bounjour account can be enabled or disabled in menu Blink->Accounts.
Search Bar
The Search bar is used for finding an existing contact or for entering a SIP address or telephone number.
The shortcut key for accessing the search bar is Control+F
To search for a local contact in the Blink Contacts List or the syncronized Google Contacts, type text in the Search Bar. You may select a Contact that matched the typed text or use the typed text as the Contact for the next action. Use the buttons presented at the bottom of the main window to start a session to the current selected Contact or press on Add Contact to add the typed address to the Contacts List.
Pressing Enter after entering text in the search bar will start an audio call to that address.
If you have registered a SIP Account with Blink, you can search for SIP addresses of other Blink users in menu Tools->Search for people....
Presence Bar
You can use the elements in this section of the interface to change your presence state.
Panel Switcher
This button can be used to switch between the Contacts and Calls panel.
Contacts List
Blink contacts are stored locally and can be synchronized using XCAP protocol, if the service provider supports it. Create one SIP2SIP account if you want to synchronize the contacts of multiple Blink instances.
Contacts are organized into Groups. Groups can be collapsed or expanded by clicking on their left-side triangle.
Right click on a Group or Contact to see all possible actions for each of them.
Clicking on a contact and pressing Enter or double-clicking a Contact will start the default session type depending on the preferred media configured for each Contact. The default action is to start an audio call.
Google Contacts
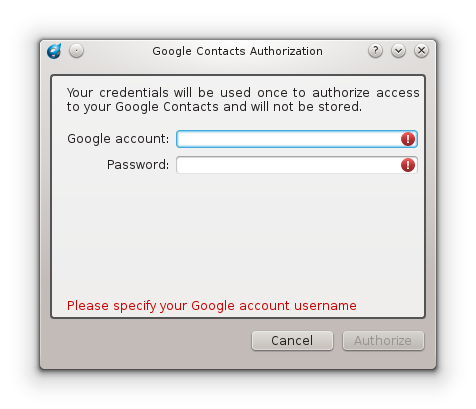
The group named Google Contacts displays addresses synced with the Google gmail service. To enable Google Contacts syncronization, go to menu* Tools->Enable Google Contacts*. When prompted type in your Google account credentials. You can disable the Google Contacts from the same menu.
Google Contacts are read-only, they cannot be edited in Blink interface.
Bonjour Neighbours
Bonjour Neighbours appear in the Contacts List as a separate Group. When selecting Bonjour as the default account, Bonjour Neighbours group is expanded and moved on top of the Contacts list. When changing back to a regular SIP Account, the groups in the Contacts list reshuffle to their previous positions.
Action Buttons
Sessions
Use the corresponding buttons presented at the bottom of the main window for starting an audio, video or chat session to the default address of the selected Contact.
To start a session to another address than the default, right click on the Contact and then click the desired address in the list that appears in the contextual menu of each session type.
Add Contact
You can add a Contact to the Contacts List by clicking on the + button
presented on the bottom left of the main interface. After this the
"Add Contact window" appears. The contacts can be stored either locally on
the computer that runs Blink or the storage server for the SIP accounts that
have XCAP storage feature enabled.
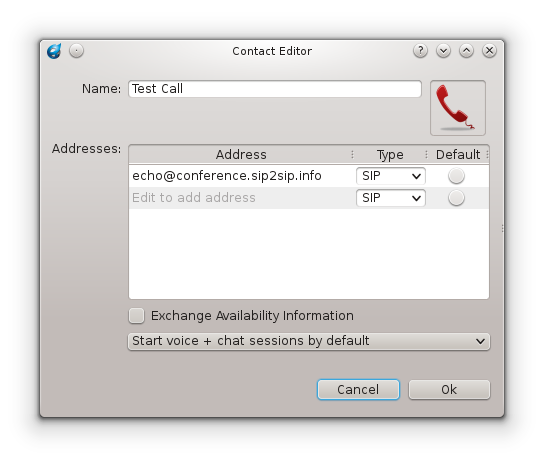
Edit Contact
You can edit a Contact by right clicking on it and select Edit menu option. "Edit Contact window" appears. To set the Icon for the Contact, click on the Icon area, a file selection dialog appears. If Subscribe to Presence is enabled and the contact publishes its own icon, the icon is automatically retrieved from the network. If a local icon is selected, it will overwrite the network provided icon.